 |
| polymer clay hacks |
What is polymer clay?
Polymer clay is such a great
idea to start work with. polymer clay is a mouldable
plastic made out of polymer polyvinyl chloride the best part of working with polymer clay is you can remold it if you are not
satisfied with your work until it is baked and it doesn’t easily harden on its
own, it needs to be baked to fully harden. you can easily create some really
beautiful things like buttons, earrings, pendants, charms, and many more. Once the polymer clay artwork is baked, you
can easily personalize your craft by painting, drilling, buffing, or sanding
it. you can use mica powder, glitter, or leaf foil to make it more
attractive. If you haven’t tried
crafting with clay, what are you waiting for?
Working with polymer clay is an
easy task but you need to follow a few measures while handling the clay. If you are a newbie to Polymer Oven
Bake Clay, you will be looking for tips to help you with your creations.
We are putting together our quick and amazing
polymer clay hacks to ease your task with polymer clay that you can use for
your craft In this article, here are a few of my
favorite polymer clay tips, trick, and hacks :
- Wash your hand before using polymer clay: Polymer clay is very sensitive to dirt or natural oil or grime. so it is very important to clean your hand or gloves properly before working with polymer clay, especially while working with white or light color polymer clay otherwise your end work will have some dirt or fingerprint marks. Also, make sure to clean your hand if you are switching colors. Lastly don’t forget to dry your hand properly.
- Best work surface for polymer clay: One will find many tutorials on youtube using
wooden blocks, ceramic or acrylic sheets, or silicon mats as working areas for
polymer clay art. It is better to work with smooth and stiff surfaces like ceramic
tile for rolling and cutting tasks on polymer clay. As per my experiences, I won't
suggest using wooden blocks for cutting polymer clay because every time the
small wooden chunks stick to the clay. Again don’t forget to use a clean surface for
your polymer clay work and remember that clays will dull or even remove the
finish from a fine wood surface.

polymer clay working sheet - Creating your own custom-colored polymer clay: Did you know you can easily mix
different colored polymer clay? Mixing colors makes the project more
exciting as you can experiment to come out with a whole new range of polymer
clay colors. I really love mixing clays to make new colors, especially for canes
or kaleidoscopic canes. you can mix
polymer clay of different colors and
brands to create your very unique color polymer clay. This can be done easily
using hands and mineral or baby oil if needed( means to smooth the clay of
different brands ). Here is the link to a few youtube tutorials for
mixing polymer clay for new colored clay
- Storing the polymer clay: Polymer clay can be reused till it is not baked
and it will stay soft for a very
long time under the right conditions. So it is very important to store
the leftover clay properly for reuse. Use re-sealable baggies or fishing
tackle box or any section closed container to keep dirt, air-borne particles or
hair, or other color polymer clay away from your clay. Keep the clay away from
extreme heat as it will be a little difficult to condition the clay

storage box for polymer clay - Hardening the clay: Sometimes clay became too soft while conditioning or due to wrong storage. To make your clay hard for a better result, leave it in the freezer for a few minutes. Now the clay is in good usable condition. Or you can do this hack also Put the piece between two sheets of paper or keep one side folded and place a heavy book over it on top. Leave it there for at least 30 minutes.
- Working with tools: For cutting the polymer clay, metal or plastic
tools can be used. If the clay sticks to the cutting tools while cutting it, use
corn starch or baby powder to make your cutting tools nonsticky. Remember to
clean the powder or corn starch with a clean soft brush from the clay after
cutting and before baking.

polymer clay tools - Baking precautions: Always follow the directions on the package of
your polymer clay for baking it.
temperature and time are the two
important factors while baking the clay in the oven. Every brand of clay has
its own predefined temperature to bake the clay. If you are working with a different colored brand of polymer clay together for your project, then it is
better to go with minimum temperature to avoid the burning of clay. Bake polymer
clay at 110 degrees Celsius for 10- 15 minutes. Baking the clay at a high temperature
may burn the clay piece. Don’t use the polymer clay oven for other cooking
purposes or use parchment paper while baking it. Parchment Paper is safe in the oven at clay
temperatures.
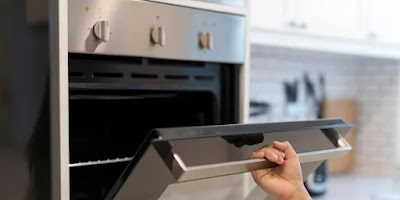
baking the clay - Too hard clay: If the polymer
clay is too hard and crumbly to work on, add a small amount of baby oil or
mineral oil, or vegetable oil while
conditioning the clay. This will make it softer and easy to work with. Add drop
by drop to soften the clay or the clay became more sticky.
source
soften the polymer clay - Taking care of polymer clay tools: Keep your polymer clay in a clean and dry place to avoid any dirt or hair. Sharp tools should be placed properly avoid the reach of children or toddlers. Don’t use polymer clay cutters for other purposes like cutting cookies or cutting fruits.
- Avoiding air bubbles: Try to avoid any air bubbles while rolling and conditioning the polymer clay. If you are using a hand roller, use parchment paper while rolling the polymer clay sheet, it helps to remove air bubbles. Place the fold first into the pasta roller machine and allow it to press together to avoid bubbles After baking if you find any bubbles on the final work, pop it with a toothpick just after baking or when it is hot. Popping the bubble when the clay is cold won’t work
- Cleaning the polymer clay piece: To remove fingerprints or dirt from your
polymer clay artwork before baking it, genetly rubbed the dirt surface with
alcohol on cotton. You can also go for other option like nail polish remover or baby wipes
poured on ear cleaning buds.

cleaning the polymer clay
- Conditioning the clay: To condition the clay, slice and chop it with
a blade or with a processor. If conditioning the clay with hand, roll the clay
into a snake, ball it up, and roll it out again. Repeat these steps many times
till the clay gets smooth enough to cast any shape.


Using these simple tips
will help you make your crafts more efficiently. Do try these simple hacks and
let us know which one is your favorite!
 |
| polymer clay hoop earring |
Get more ideas!


